Creating Windows Installation Media on macOS
This is an alternative method
This method may provide a subpar experience compared to our primary macOS workflow.
For the best and recommended experience, follow the main macOS guide: macOS.
Let's discover USBZile in less than 5 minutes.
What you'll need
- An 8GB or larger USB stick/flash drive
- If you need one, we recommend and test with the following USB stick
- macOS 10.13.6 (High Sierra) or newer
- Supports Apple Silicon (M1, M2, M3, and M4) and Intel Macs.
- USBZile
- CMOS
- Windows Disk Image
Creating the Installation Media
On your macOS device
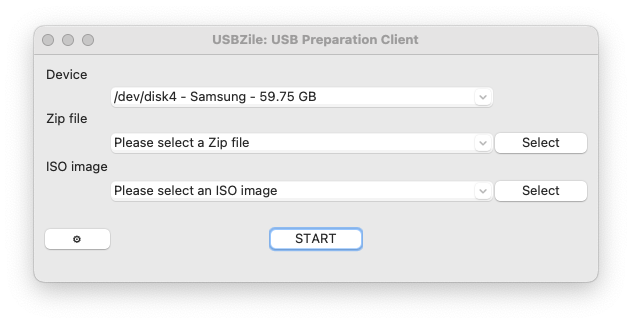
- Open USBZile
- Put USBZile into Zip + ISO mode by clicking the settings icon (⚙) in the bottom left corner.
(show screenshot)

- Under Device select the USB stick/flash drive that you want to turn into installation media
- Note: This process will delete all data on the selected USB stick/flash drive
- Under Zip file select the CMOS ZIP file you downloaded earlier
- Under ISO image select the Windows Disk Image you downloaded earlier
- Click START, then wait for the USB stick/flash drive to be created
On your soon-to-be Windows device
- Plug the USB stick/flash drive into your soon-to-be Windows device
- Boot to the USB stick/flash drive
- Sit back and relax as CMOS finalizes your Windows Installation Media
- Once complete CMOS will automatically restart your PC
Congratulations, you now have a Windows Installation Media USB!
This USB can now be used on the current PC or any other PC of your choice.